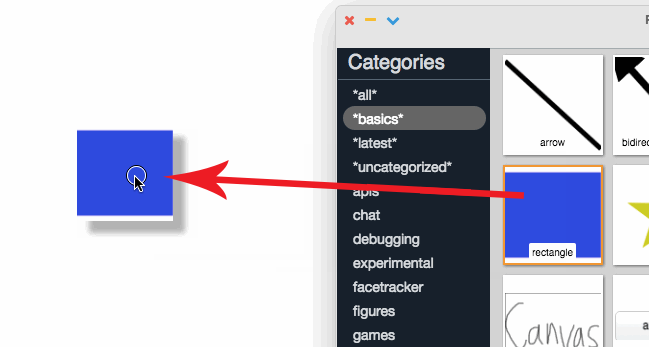
Step 1: Drag a rectangle from the PartsBin
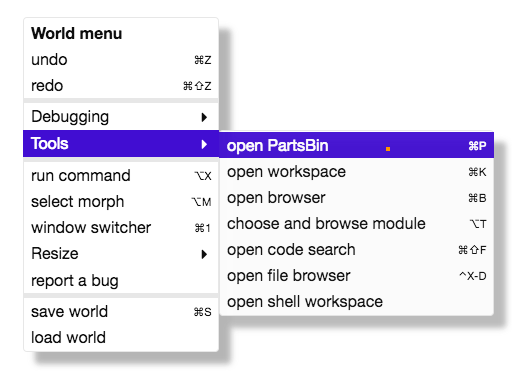
- Open the world menu via control-click or right-click
- Choose Tools => open PartsBin
- The Rectangle is in the basics category
In the example right we have modified the fill and border properties.
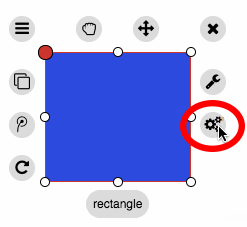
Step 2: Change the appearance of the rectangle.
Open an inspector via the halo. The inspector gives you access to properties of objects. For specific "types" of properties the inspector provides customized tooling, e.g. a color picker for color related properties such as fill or borderColor.
Step 3: Get a label, input line and button from the PartsBin and drop them into the rectangle so that the reactangle becomes the parent object for the new items.
Step 5: Define the form behavior
Open an object editor via the wrench halo item and click on the + button in the lower left. This will add a new, object specific subclass.
Then define a method checkName. For now it will only notify the user about the text in the text input. (We will add more complex behavior later).
Note that establishing connections via the halo items is an alternative to doing it programmatically via
connect(button, "fire",
form, "checkMethod");
Step 6: Hook up the button to the form's checkName method.
The result so far
Step 4: Change the labels to make the widgets more descriptive.
This tutorial describes how to create a form widget. This includes:
1. Assembling a GUI with lively.morphic using the PartsBin and inspector
2. Creating custom behavior with the object editor
3. Connecting graphical components via data bindings (connect)
Step 7: Working with real data
For the example we will use the API that propublica (https://projects.propublica.org) provides. For the name we enter into our form field we will try to find a house representative or senator of the current U.S. house or senat using propublica's congress members API.
The API requires us to register an API key that we have to send along with our requests. It is recommended that you use your own key instead of reusing our tutorial key listed below.
To use the API in its simplest form we open a workspace (world menu => Tools => open workspace) and enter:
// use lively.next network abstraction to do HTTP communication
import { resource } from "lively.resources";
// create a HTTP request object
let req = resource(`https://api.propublica.org/congress/v1/115/senate/members.json`);
// propublica does not offer cross origin resource sharing (CORS, see
// https://developer.mozilla.org/en-US/docs/Web/HTTP/CORS). In order for the
// browser to be allowed to make a request to this foreign server we use the
// lively.next internal proxy
req.makeProxied();
// add api key to authorize our HTTP request against the propublica API
req.headers["X-API-Key"] = "TPvKTecqWk9P0phZcoZydNUpoOXj6f6WMN7BYqaX";
// make the request, save it in variable "data"
let data = await req.readJson();
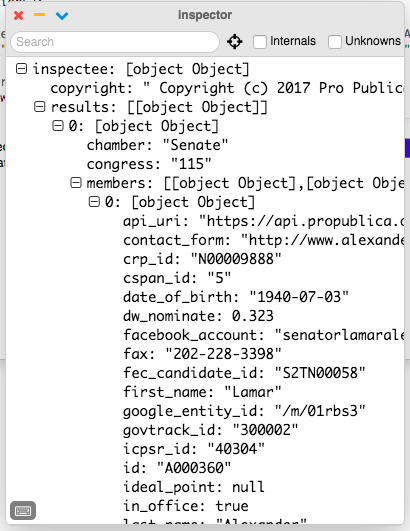
When you select and evaluate all the code (text menu => doit) the data variable will be defined. Inspect it:
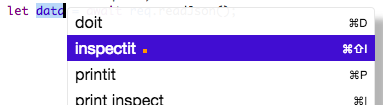
As you can the the data structure we get back has a couple of properties not important for us. We are mostly interested in the data.results[0].members list. It includes names and descriptions of senators and representatives, especially note the first_name and last_name attributes.
Step 8: Combining the API with the form
We can now extend the form so that on button press we query the propublica API, get a list of senators and representatives and try to find one whose name matches our form input.
First we will extend our HTTP request to fetch all desired data. We will directly add this in the form's object editor as a new method:
class TestForm extends Morph {
async fetchSenatorsAndRepresentatives() {
let apiKey = "TPvKTecqWk9P0phZcoZydNUpoOXj6f6WMN7BYqaX",
congress = 115, // current congress, see https://projects.propublica.org/api-docs/congress-api/members/?#lists-of-members
chamber1 = "house",
chamber2 = "senate",
req1 = resource(`https://api.propublica.org/congress/v1/${congress}/${chamber1}/members.json`),
req2 = resource(`https://api.propublica.org/congress/v1/${congress}/${chamber1}/members.json`);
// add api key to both requests;
req1.headers["X-API-Key"] = apiKey;
req2.headers["X-API-Key"] = apiKey;
let data1 = await req1.makeProxied().readJson(),
data2 = await req2.makeProxied().readJson(),
members = data1.results[0].members.concat(data1.results[0].members);
return members;
}
/*...*/
}
Then, we can change the checkName method. We will simply compare our input with the concatenated first_name and last_name fields.
async checkName() {
let nameToFind = this.get("input line").input;
let members = await this.fetchSenatorsAndRepresentatives();
let found = members.find(ea => {
let name = ea.first_name + " " + ea.last_name;
return nameToFind === name;
});
let answer = found ?
this.printMember(found) :
`No one with the name "${nameToFind} found."`
$world.inform(answer);
}
If we find a matching result, we will want to print the data for the house or senate member in a readable format:
printMember(member) {
let {first_name, middle_name, last_name, title, state} = member;
let name = first_name;
if (middle_name)
name += " " + middle_name;
name += " " + last_name;
return `${ name } is ${ title } of ${ this.stateNames()[state] }`;
}
stateNames() {
return {
AK: "Alaska",
AL: "Alabama",
/*... see https://gist.github.com/mshafrir/2646763 for full list*/
}
When we now press the submit in our form we get:
Tutorial: Creating a formular with custom behavior